Someone recently commented on my painted table asking me how easy/or difficult it was to do. The answer is “very easy,” in fact so easy that I’ll tell you how you can do your own.
The table is about ten years old now, but just a few years after we purchased it, the finish was worn off. Any time the kids ate anything sticky it took elbow grease and time just to get it clean again. I’d soak it with warm cloths and scrape it with a metal spatula. It wasn’t the best piece of furniture to have in the kitchen where my kids slop, drop, and drool.
I had decided to buy a new one, but hadn’t gotten around to it yet when the idea came to me to paint it! So with the blessing of my husband and a Saturday afternoon to spare I got to work.
- First off I had to decide what to paint. I knew that I wasn’t the best artist around, so I decided to go with a simple design consisting of straight lines. I decided on a checkerboard center.
- I sanded the top. It didn’t take long at all since the finish was so worn off. I just took a piece of sand paper and gave it a good going over.Then I washed the surface with a slightly damp cloth.
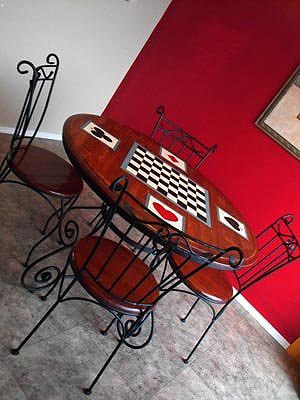
- Using a pencil and a ruler I sketched out my design. I decided that the checkerboard wasn’t enough so I cut a heart shape out of a cereal box and drew out four boxes with four hearts where each person would sit. I was looking for a country kitchen look of soft blue, cream, and red. (yeah, I know it’s different in the photo, read on…)
- Once it was all drawn out I used small bottles of craft paint that I had hanging around, and painted the surface with a fine paint brush, alternating with a medium slightly fuller brush.
- I used a black Sharpie to define the edges. A Sharpie and a ruler gave me a straighter edge than my unsteady hand ever would.
- Once it was all painted, my dear husband walked in the room and said, “Cool! It reminds me of a games table! Maybe you should repaint three of those squares to look like cards.” So I did. I just covered the squares with cream colored paint and penciled in a diamond, club, and spade.
- Once it was all painted, we let it dry. But not for long because I’m impatient! Ha.
- Then Brendan and Michael dragged it out into the back yard where I sprayed the surface with spray varnish. That was the only tricky part. I had the table on it’s side and the varnish wanted to drip. So I stood it back up and did one light coat at a time.
- We did several coats to ensure that the table would be washable and functional this time!
Painting wooden furniture is a creative way to salvage an item that you might be ready to throw out. It was an awesome decision for me, and as a matter of fact, it’s not the first time I’ve done this.
About 13 years ago our neighbors had a white table with a wooden table top sitting in their driveway for garbage pick up. I asked them if they wouldn’t mind if I took it. I knew that it would be the perfect size for a homeschooling desk for my son. So I dragged it into the house and I got to work on it.
For that table top I used a ruler to draw lines, and then I used stencils to paint words. once the paint was dry, I erased the pencil rules.
The final design was mid-sized script writing that read,
“And thou shalt teach them diligently unto thy children, and shalt talk of them when thou sittest in thine house, and when thou walkest by the way, and when thou liest down, and when thou risest up.” ~ Deuteronomy 6:7
It was such a beautiful gift from a mom to her son. I still have the table, but it’s stuck behind a cabinet in storage, and I can’t budge it to take a photo. But over the years it did get worn out, so it’s not all that much to look at now anyway.
You are loved by an almighty God,
Darlene
For comments or questions, contact me at:
darlene[at]darleneschacht.net
Why no comments? Click here
Click to share on Facebook:
This post is linked to these websites:

